Wednesday 28 February 2018

Carrot and Ginger Soup

carrot and ginger soup

Since my return from holiday, we've been hit by snow which has been something of a shock to the system! I've been craving warming soups and stews along with curries, comforting pasta and baked potatoes oozing with fillings. One of the dishes I've been enjoying is this Carrot and Ginger Soup, which tastes delicious and is so simple to make, with just 5 affordable and readily available ingredients (plus salt & pepper). I like to make a big batch (doubling or even quadrupling the recipe) on Sunday ready for the week ahead and it's worth noting that it freezes well too, which I do in individual portions ready to defrost for lunch or a simple supper as needed.

Three great health benefits: boosts immunity, beneficial for digestive health, rich in antioxidants

Serves 2 

Ingredients:
2 tbsp coconut oil
1 onion, chopped
1 & 1/2 inch piece fresh ginger, grated
350g carrots, chopped
1 litre vegetable stock
Sea salt and black pepper

Method:
1) Heat the coconut oil in a large saucepan over a medium heat on the hob.
2) Add the onion and lightly fry for a couple of minutes, until softened.
3) Next, add the ginger and fry for a further 1-2 minutes before adding the carrots and stirring.
4) Add the vegetable stock and bring to the boil. Reduce the heat and simmer for 20- 30 minutes until the carrots are softened. Season with salt and pepper, to taste.
5) Place the soup in a blender (you may need to do this in batches) and blend until smooth. Reheat to serve.

Let me know if you try out this recipe! Tag me on Twitter @HaloEats or Instagram @halo.eats 
Share:

Monday 26 February 2018

Easy, Cheesy "Parmesan"

easy cheesy parmesan

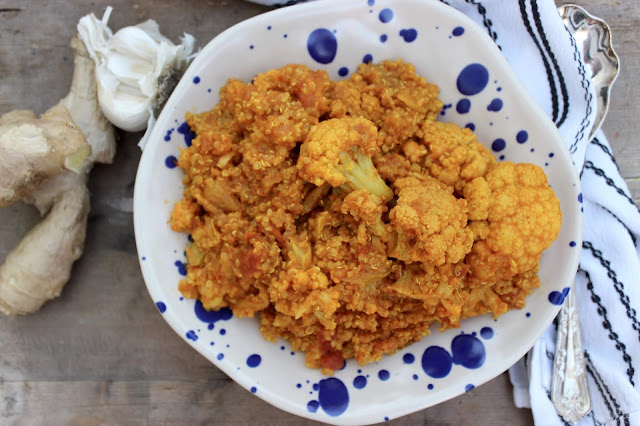
If you're not accustomed to this style of cooking and eating then making your own dairy-free "parmesan" is likely to sound a little crazy and probably difficult too. The reality is that it couldn't be easier and really captures that cheesy taste. I like this sprinkled over salads and pasta dishes- any way that the original parmesan would be used!

Three great health benefits: boosts immunity, beneficial for bone health, promotes healthy skin

Makes 1 small bowl
Keep refrigerated in an airtight container

Ingredients: 
1/4 cup cashews
1 tbsp nutritional yeast
Pinch garlic granules
Pinch sea salt

Method: 
1) Place all of the ingredients in a food processor and whizz until the texture resembles a fine crumb.

Let me know if you try out this recipe! Tag me on Twitter @HaloEats or Instagram @halo.eats 
Share:

Friday 23 February 2018

Super Green Juice

super green juice

I've been drinking a lot of green juices lately. They instantly impart a feeling of virtuousness and thanks to the endless possibilities when it comes to flavour combinations, they're never boring. This one really packs in the fruit and vegetables so is full of goodness yet tastes refreshing. Don't be put off by the alarming green colour- it really is an easy to drink version (suitable for beginners!) and simply tastes so good! 

Three great health benefits: boosts immunity, promotes healthy skin, anti-inflammatory

Serves 2
Enjoy immediately

Ingredients: 
2 handfuls kale
2 handfuls spinach
1 fennel bulb
1 pear
1 lime, peeled
1/2 cucumber
Few sprigs mint 

Method: 
1) Starting with the mint, feed all of the ingredients through a juicer. Enjoy immediately. 

Let me know if you try out this recipe! Tag me on Twitter @HaloEats or Instagram @halo.eats 
Share:

Wednesday 21 February 2018

Warm Turmeric Roasted Cauliflower and Chickpea Salad with Creamy Dressing

warm turmeric roasted cauliflower and chickpea salad with creamy dressing

If you've ever thought that salads aren't satisfying or that they should be solely reserved for summer, then you need to try this. In-season cauliflower is spice roasted with chickpeas to add a warming element that's wonderfully filling. The creamy dressing balances the mild spice flavour and slightly bitter rocket leaves, whilst the inclusion of vitamin C rich lemon juice aids in the absorption of iron from the rocket. As the name of this recipe suggests, I love serving this salad warm but it also tastes great cold if you prefer to make it in advance.

Three great health benefits: anti-inflammatory, helps support the body's detoxification process, good source of fibre

Serves 2

Ingredients:
1 cauliflower, outer leaves removed and chopped into florets (mine weighed 500g)
1 tbsp coconut oil, liquid
1 tbsp ground turmeric
1/4 tsp ground cumin
1/4 tsp cayenne pepper
Sea salt and black pepper
1 x 400g tin chickpeas, drained
3 handfuls rocket

For the dressing: 
2 tbsp coconut yoghurt
2 tbsp water
1 tbsp tahini
Juice of 1/2 lemon 
Sea salt and black pepper

Method:
1) Preheat oven to 200 degrees C.
2) Place the cauliflower in a roasting dish with the coconut oil and sprinkle with the spices, tossing to ensure that the florets are evenly covered. Roast in the oven for 20 minutes.
3) After 20 minutes, add the chickpeas, again tossing to ensure that they are also evenly covered in the spices. Return to the oven for 10 minutes.
4) Meanwhile, make the dressing by whisking together the coconut yoghurt, water, tahini, lemon juice and salt & pepper.
5) To serve, place the rocket in a serving dish and top with the roasted cauliflower and chickpeas. Drizzle with the creamy dressing to taste.

Let me know if you try out this recipe! Tag me on Twitter @HaloEats or Instagram @halo.eats
Share:

Monday 19 February 2018

Cauliflower, Apricot and Quinoa Curry

cauliflower apricot and quinoa curry

I know that I post a lot of curry recipes but the reality is that this reflects the way I eat, opting for them on a regular basis. I've said it time and time again and can only repeat that curries are a great way of introducing this way of eating to those who are cynical about it (proving that it's not all "rabbit food"!). They're packed full of flavour, feel like a "treat" thanks to their takeaway associations and, ideally for busy lifestyles, are perfectly suited to batch cooking and advance prep. On Sundays, I can often be found batch cooking ready for the week ahead and curries inevitably feature somewhere.  This curry mixes things up a little with the addition of sweet apricot, which combines with the other ingredients including tinned tomatoes to give a slightly sweet and sour curry flavour. I've also snuck in some quinoa. It's one of my favourite foods and packed full of goodness (it's a complete protein source so ideal for those following plant-based diets) but my boyfriend remains cynical so this curry was my attempt to inject a little extra quinoa into our lives.

Three great health benefits: good source of plant-based protein, good source of fibre, anti-inflammatory

Serves 2-3

Ingredients:
1 tbsp coconut oil
1 onion, finely sliced
3 cloves garlic, crushed
1 inch piece fresh ginger, grated
2 tsp ground turmeric
1 tsp ground coriander
1 tsp ground cumin
1/2 tsp hot chilli powder
1/4 tsp hot smoked paprika
1 tbsp tomato puree
1 cauliflower (600g), roughly chopped into florets
100g dried apricots (try to use unsulphured if possible), roughly chopped into quarters
100g quinoa (uncooked), rinsed
1 x 400g can chopped tomatoes
1 x 400ml can coconut milk

Method:
1) Warm the coconut oil in a large saucepan over a low heat on the hob.
2) Add the onion and stir. Cover with a lid and cook over the low heat for 10- 15 minutes so that the onion "sweats" and "sweetens". Stir occasionally. Remove the lid.
3) Add the garlic and ginger and stir. Lightly fry for a further minute.
4) Next, stir in the spices: ground turmeric, ground coriander, ground cumin, hot chilli powder and hot smoked paprika. Add 1 tbsp water to prevent sticking and to make a paste. Add the tomato puree and stir.
5) Add the cauliflower, dried apricots and quinoa and stir. Stir in the chopped tomatoes then pour 200ml water in the empty tin and swish around before adding to the saucepan (to obtain all of the juices from the can). Stir in the coconut milk and bring to the boil.
6) Reduce the heat and simmer, stirring regularly, for approximately 20 minutes until the quinoa and cauliflower are cooked through.

Let me know if you try out this recipe! Tag me on Twitter @HaloEats or Instagram @halo.eats 
Share:

Friday 16 February 2018

Stir Fried Brussels Sprouts

stir fried brussels sprouts

I always like to include a stir fry option around this time of year in celebration of Chinese New Year. Even if you don't recognise the holiday, the fresh flavours are a welcome break following the stodginess of winter and Christmas food. What's more, stir frying inherently offers a quick and easy cooking option and the method helps to retain nutrients in vegetables- particularly needed at this time of year! I recently ate at my local Chinese restaurant (which can be a challenge when you follow this type of diet but I'm very lucky that they have a wonderful chef who is able to cater for me) and enjoyed a delicious stir fried brussels sprouts dish, which inspired me to create my own version.
Stir frying is actually a really clever way to cook Brussels sprouts as it ensures that they retain their crunch and also allows for the addition of other flavours, to truly bring the dish to life. The chilli miso sauce in this recipe adds a wonderful depth of flavour. It's spicy, warming and cleansing and really captures those classic Chinese flavours.

Three great health benefits: boosts immunity, beneficial for bone health, beneficial for digestive health

Serves 2
Enjoy immediately

Ingredients:
400g Brussels sprouts, washed thoroughly, with the bases removed and each sprout sliced in half
2 tsp toasted sesame oil

For the sauce:
1 tbsp miso paste
1 tbsp toasted sesame oil
1 red chilli, finely chopped (remove the seeds if you wish to reduce the spiciness)
1 clove garlic, crushed
1 tsp apple cider vinegar

Method:
1) Warm the 2 tsp toasted sesame oil in a wok over a high temperature on the hob. Add the Brussels sprouts and stir fry for a few minutes until the sprouts are lightly browned.
2) Meanwhile, make the sauce by whisking together the miso paste, 1 tbsp toasted sesame oil, chilli, garlic and apple cider vinegar. The sauce will be a paste consistency.
3) Pour the sauce over the Brussels sprouts in the wok and stir fry for a further minute. Serve immediately.

Let me know if you try out this recipe! Tag me on Twitter @HaloEats or Instagram @halo.eats 
Share:

Wednesday 14 February 2018

Salted Caramel and Almond Chocolate Truffles

salted caramel and almond chocolate truffles

These chocolate covered, salted caramel & almond centre truffles taste wonderfully rich and indulgent. They are the perfect treat for Valentine's Day- whether you want to treat yourself or another someone special!

Three great health benefits: boosts mood, beneficial for heart health, promotes healthy skin

Makes 14
Keep refrigerated

Ingredients:
For the salted caramel centre:
3/4 cup medjool dates, pitted
1/4 cup smooth almond butter
1/2 tsp vanilla extract
1/4 tsp sea salt

For the chocolate:
1/4 cup coconut oil
1/4 cup maple syrup
1/4 cup cacao powder

Generous pinch sea salt, to decorate

Method:
1) Whizz the dates in a food processor to finely chop. Add the almond butter and vanilla extract, followed by the salt and whizz to thoroughly combine. The mixture will start to come together.
2) Roll the date mixture into balls (approx the size of a marble). Refrigerate for at least an hour to set.
3) Next, make the chocolate by gently melting together the coconut oil, maple syrup and cacao powder in a small saucepan over a medium heat. Set aside to cool slightly so that the mixture thickens.
4) Dip each salted caramel and almond ball into the chocolate mixture, one at a time, ensuring they are completely covered. Place onto a plate or dish, lined with greaseproof paper and sprinkle with a little sea salt to decorate. Refrigerate for at least an hour to set.

Let me know if you try out this recipe! Tag me on Twitter @HaloEats or Instagram @halo.eats 
Photo credit: with thanks to www.tiffany-matthews.com 
Share:

Friday 9 February 2018

Cauliflower Pizza

cauliflower pizza

I'm often asked which food I miss most from before I changed my eating habits. The truth is, there's nothing that I really miss whether it be because my tastes have changed or simply the fact that there's a healthy alternative to practically everything! Admittedly, it took me some time to realise this and previously, my answer was always unquestionably pizza. Not only is pizza delicious but I also missed the social element of sharing a pizza on a casual night with friends.
With this in mind, it was only a matter of time before I shared a pizza recipe with you and it seemed only fitting to today, which is National Pizza Day! I really hope that you'll try this healthy twist on the classic pizza, which packs in the fruit and vegetable portions whilst still capturing those Italian flavours and has the added bonus that it won't leave you feeling bloated or lethargic. Remember to take your time squeezing out the excess water from the cauliflower to avoid a soggy base!

Three great health benefits: supports the body's detoxification process, boosts immunity, good source of fibre

Makes 1 pizza
Enjoy immediately

Ingredients:
2 tbsp chia seeds
1 cauliflower, leaves and stalk removed and chopped into florets (mine weighed 325g)
2 tsp dried Italian herbs or oregano
Pinch sea salt
1/3 cup coconut flour
2 tbsp olive oil
4 tbsp tomato puree

Topping suggestion:
3-4 fresh basil leaves, shredded
50g mushrooms, sliced
50g sundried tomatoes, chopped
Optional: black pepper, extra virgin olive oil and a handful of rocket

Method:
1) Mix the chia seeds with 8 tbsp water and set aside for half an hour, to form a gel.
2) Preheat oven to 180 degrees C.
3) Place the cauliflower into a food processor and whizz until it resembles breadcrumbs. Use a clean nut milk bag or muslin cloth to squeeze out the excess water from the cauliflower. Discard the water and return the cauliflower to the food processor.
4) Add the chia seeds, herbs, salt and coconut flour to the food processor and whizz together.
5) Grease a large baking tray with the olive oil.
6) Tip the dough, in a ball, onto the baking tray and press or roll out into a circle of your desired thickness. Bake for 20 minutes.
7) After 20 minutes, remove from the oven and top with the tomato puree, ensuring that it is evenly spread over the base. Add the basil, mushrooms and sundried tomatoes and return to the oven to cook for a further 5-10 minutes.
8) If desired, grind a little black pepper, drizzle with a little extra virgin olive oil and top with a handful of rocket before serving.

Let me know if you try out this recipe! Tag me on Twitter @HaloEats or Instagram @halo.eats 
Share:

Wednesday 7 February 2018

Spice Roasted Butter Beans

spice roasted butter beans
These Spice Roasted Butter Beans may not be much to look at but the layers of flavours in these protein packed snacks make them taste amazing! Seriously addictive!

Three great health benefits: good source of plant-based protein, good source of fibre, beneficial for digestive health

Makes 1 small bowl
Best enjoyed the day they are made

Ingredients:
1 x 400g tin butter beans, drained
1 tbsp milled flaxseed
1 tbsp sesame seeds
1 tsp cumin seeds, crushed
1/2 tsp fennel seeds, crushed
1/4 tsp hot smoked paprika
Sea salt and black pepper
1 tbsp maple syrup
2 tsp coconut oil, liquid

Method:
1) Preheat oven to 200 degrees C.
2) Pat the butter beans dry using paper towels (you can even do this step the night before to really ensure that the beans are dry).
3) Mix together the milled flaxseed, sesame seeds, cumin seeds, fennel seeds and salt & pepper in a medium bowl. Stir in the maple syrup.
4) Add the butter beans to the spice mixture and stir to combine, ensuring the beans are evenly coated in the mix.
5) Drizzle a baking tray with the coconut oil and add the spice coated beans, turning them in the oil so that they are evenly coated. Roast for 15 minutes, turning halfway through the cooking time. Remove and set aside to cool.

Let me know if you try out this recipe! Tag me on Twitter @HaloEats or Instagram @halo.eats 
Share:

Monday 5 February 2018

Green Juice for Beginners

green juice for beginners

Green juices have seen an incredible surge in popularity over the last few years- hardly a celebrity has been papped without one and they're now readily available in cafes, supermarkets, etc.. It's perhaps unsurprising as they're a great way to cram in some goodness and are a convenient way to boost the "5 a day" intake when we're all living increasingly busy lifestyles. That said, they can prove intimidating to beginners. There are countless flavour combinations but admittedly, some can taste a little "grassy", particularly to newbies. I've called this recipe "Green Juice for Beginners" because it has a refreshing flavour and is a milder green juice than many, making it an ideal introduction. Of course, even if you're a seasoned juicer, you can still enjoy this too! 

Three great health benefits: helps support the body's detoxification process, anti-inflammatory, beneficial for eye health

Serves 1
Enjoy immediately 

Ingredients:
2 handfuls kale
1 apple
1 lime, peeled
1/3 cucumber
Few sprigs of mint

Method:
1) Starting with the mint, feed the ingredients through a juicer. Enjoy immediately.

Let me know if you try out this recipe! Tag me on Twitter @HaloEats or Instagram @halo.eats 
Share:
© halo eats | All rights reserved.
Blog Layout Created by pipdig