Friday 28 September 2018

Broccoli and Brown Rice Salad with Miso Dressing

Broccoli and Brown Rice Salad with Miso Dressing

Let me start off today's recipe post by fully acknowledging that a Broccoli and Brown Rice Salad may be a step too far for some. Let's be honest- it completely conforms to the traditional vegan stereotype, which isn't something that I like to do because I'm all about challenging those views that this way of eating revolves around boring "rabbit food" (don't worry, there won't be a "How to Tie-Dye" post coming soon!). That said, Halo Eats does reflect the way that I eat and for that reason, I couldn't not share this recipe. I love this simple yet delicious dish, which is one I've been enjoying for years. It's a good way to use up leftover brown rice but as I enjoy this so much, I tend to increase the quantity of brown rice when cooking on curry night and then have this as a salad for lunch the following day. That said, it also works well warm. It's really all about the miso dressing, which really packs a flavour punch-  I'm sure you'll find it as addictive as I do & return to this recipe time & time again.

Three great health benefits: boosts immunity, promotes healthy skin, beneficial for eye health

Serves 2

Ingredients:
1- 1 & 1/4 cups cooked brown rice
1 head broccoli (300g), cut into florets
1/2 tsp sesame seeds

For the dressing:
1 tbsp miso paste
1 tbsp maple syrup
2 tbsp sesame oil
Juice of a lime
1/2 inch piece fresh ginger, grated
1 tsp tahini
Pinch chilli flakes

Method:
1) Steam the broccoli for approximately 5-6 minutes, until cooked but still crunchy.
2) Meanwhile, make the dressing by whisking together the miso paste, maple syrup, sesame oil, lime juice, ginger, tahini and chilli flakes.
3) Divide the brown rice between two bowls and top each equally with the broccoli. Drizzle each equally with the miso dressing and sprinkle with sesame seeds before serving.

Let me know if you try out this recipe! Tag me on Twitter @HaloEats or Instagram @halo.eats 
Share:

Wednesday 26 September 2018

Pear and Ginger Crumble with Cashew Cacao Topping

pear and ginger crumble with cashew cacao topping

If you follow me on social media then you'll know that I've been sharing recipes inspired by the themes of the latest series of Great British Bake Off each week. I'm really enjoying the series and today's recipe ties in with last night's theme of "Spice Week" and also pays homage to the humble pear, which Noel talked about the previous week as being an under-rated fruit! This comforting crumble may not be much to look at but is the perfect warming dessert as the temperatures drop (of course, the return of "GBBO" also means that autumn is inevitably upon us!). It pairs pears and ginger, already a match made in heaven, with an indulgent chocolatey topping which takes the classic combination to the next level. I think that Paul and Prue would approve!

Three great health benefits: boosts mood, promotes healthy skin, beneficial for bone health

Serves 4- 6

Ingredients:
6 small pears, peeled, cored and roughly chopped (mine weighed 425g)
1 cinnamon stick
1 inch piece fresh ginger, grated
1 tbsp maple syrup

For the topping:
1 cup gluten free jumbo oats
1/2 cup cashew nuts
1 tbsp cacao powder
3 tbsp cacao nibs
Pinch sea salt
1/4 cup smooth cashew butter
2 tbsp coconut oil, liquid
1 tsp vanilla extract

Method:
1) Place the pears, cinnamon stick and grated ginger in a medium-large saucepan and just cover with water. Bring to the boil on the hob and then simmer until the pears are softened (approx 15 minutes). The time taken will vary depending on the ripeness of the pears. Remove from the heat and stir in the maple syrup. Set aside.
2) Meanwhile, make the crumble topping. Place the oats and cashews in a food processor and whizz briefly to break up (you still want the mixture to have some texture to it, it shouldn't resemble breadcrumbs). Place in a mixing bowl and stir in the cacao powder, cacao nibs and sea salt.
3) In a smaller bowl, whisk together the cashew butter, coconut oil and vanilla. Add the nut butter mixture to the dry ingredients and stir to throughly combine.
4) Preheat the oven to 180 degrees C.
5) Place the pears into an ovenproof dish in an even layer and top with the crumble. Bake for 15-20 minutes.

Let me know if you try out this recipe! Tag me on Twitter @HaloEats or Instagram @halo.eats 
Share:

Monday 24 September 2018

Roasted Tomato and Red Pepper Soup

roasted tomato and red pepper soup

I've been making this soup for so long that I was surprised when I realised that I hadn't shared the recipe before now. It perfectly combines tomato and red pepper, with the flavours intensified thanks to the roasting process, and what's more it's so easy to make.

Three great health benefits: boosts immunity, good source of antioxidants, beneficial for eye health

Serves 2

Ingredients:
6 tomatoes (400g), roughly chopped into 1/6ths
2 red bell peppers (300g), de-seeded and roughly chopped
1 clove garlic, peeled but left whole
Sea salt & black pepper
3 tbsp olive oil
500ml vegetable stock
Sprigs of basil leaves, to serve

Method:
1) Preheat the oven to 180 degrees C
2) Place the tomatoes and red pepper, along with the garlic, in a roasting tin. Season with salt & pepper and drizzle with the olive oil. Roast for approximately 40 minutes, turning halfway through the cooking time. Remove and set aside to cool.
3) Place the roasted vegetables, along with any of the oil, into a blender and add the vegetable stock. Blend until smooth.
4) Reheat to serve and sprinkle with the fresh basil.

Let me know if you try out this recipe! Tag me on Twitter @HaloEats or Instagram @halo.eats 
Share:

Wednesday 19 September 2018

Carrot Cake Porridge

carrot cake porridge

It's been a while since I shared a porridge recipe- not least because we've been blessed with a scorcher of a summer so my breakfasts haven't revolved around this warming dish in the way that they tend to in the cooler months.
My mum always starts her day with porridge topped with raisins and nutmeg because, having spent a lot of time in the Caribbean, she's a strong believer in the spice's powers- which include anti-inflammatory properties. Today's porridge recipe incorporates both raisins and a little nutmeg but takes things to the next level in a breakfast which is reminiscent of cake/ dessert. It's still good for you, with at least one vegetable portion (more if you increase the raisins slightly), protein rich nuts and, of course, oats which boast lots of benefits. I can't wait for you to try out this recipe! It really captures that classic carrot cake flavour and is such an indulgent way to start the day!

Three great health benefits: promotes healthy skin, good source of fibre, beneficial for heart health

Serves 1
Enjoy immediately

Ingredients:
1/3 cup gluten free oats
1 cup almond milk (I always use unsweetened)
1 small carrot, grated
1/2 tsp ground cinnamon
1/4 tsp ground ginger
Pinch ground nutmeg
1 tbsp raisins
1 heaped tbsp pecans
1 tbsp maple syrup

Method:
1) To make the porridge, combine the oats and almond milk in a small saucepan and cook over a medium heat on the hob, stirring regularly.
2) When the porridge comes up to a simmer, add most of the grated carrot (keeping back a pinch or two for the topping) along with the spices: cinnamon, ginger and nutmeg. Stir to combine. Continue to cook until the mixture has thickened and most of the liquid has been absorbed, approximately 5- 10 minutes. Stir in the raisins.
3) Meanwhile, make the caramelised pecans by placing the nuts in a small frying pan along with the maple syrup over a medium heat on the hob. Bring up to a boil and cook for a couple of minutes to caramelise, taking care not to burn.
4) Pour the porridge into a bowl and top with the caramelised nuts (& any remaining maple syrup from the pan) and the remaining grated carrot. Enjoy immediately.

Let me know if you try out this recipe! Tag me on Twitter @HaloEats or Instagram @halo.eats 
Share:

Monday 17 September 2018

Raw Lemon "Cheesecake"

raw lemon cheesecake

I served this at a recent event and it may well have been one of my most popular desserts yet. It's everything a "cheesecake" should be- creamy and indulgent, yet a light enough dessert to still be enjoyable after dinner- and this one has the added plus points of being gluten free and vegan friendly, naturally! I love serving this with a homemade warm blueberry compote- simply simmer together blueberries with a little water and a splash of maple syrup (to taste). As this is a rich "cheesecake", you will need to take it out of the freezer further in advance than others on Halo Eats- even I've been caught out by this as I'm so accustomed to the other recipes- but don't worry, it will hold its shape and have the benefit of the zesty lemon flavour being even more pronounced if you serve it this way.

Three great health benefits: boosts immunity, promotes healthy skin, beneficial for bone health

Serves 8-10

Ingredients:
125g almonds
175g medjool dates, pitted
3 lemons (I always use unwaxed)
Pinch sea salt
300g cashew nuts, soaked overnight, drained & rinsed
1 x 160ml can coconut cream
150ml coconut oil (liquid)
100ml maple syrup
Edible flowers, to decorate (optional)

Method:
1) Grease an 8 inch springform cake tin with a little coconut oil.
2) Whizz the almonds in a food processor to finely chop. Add the medjool dates, zest of 1 lemon and salt and whizz again until the mixture starts to stick together. Press into the prepared cake tin and refrigerate to set for a couple of hours.
3) In a clean food processor, whizz the cashews to break up. Add the juice of the 3 lemons, along with the coconut cream, coconut oil and maple syrup and whizz until smooth and creamy.
4) Stir in the zest of 2 of the lemons to combine. Pour the "cheese" mixture on top of the prepared base and place in the freezer to set overnight.
5) To serve, remove from the freezer at least one hour before serving. You can remove the "cheesecake" further in advance but you'll need to keep it refrigerated. Decorate with edible flowers, if desired.

Let me know if you try out this recipe! Tag me on Twitter @HaloEats or Instagram @halo.eats 
Share:

Friday 14 September 2018

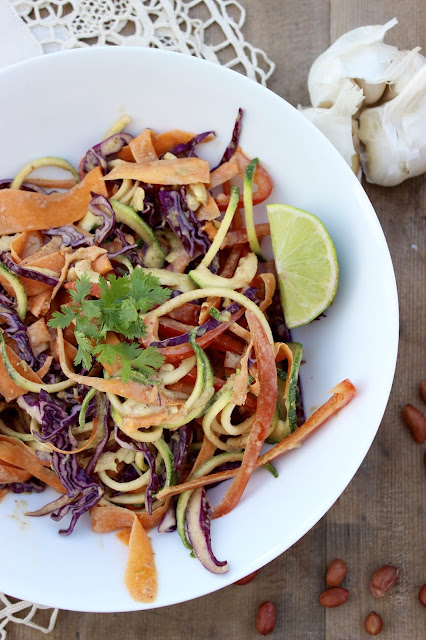
Raw Pad Thai

raw pad Thai

This is a really delicious and fresh tasting dish with a rainbow of veggies to get you well on your way to five a day! It's packed full of flavour and is so simple to prepare. I've suggested a variety of chopping methods to keep things interesting but if you don't have a spiraliser or want to make this dish even simpler, feel free to chop the vegetables thinly as desired. If you are making this for one, I'd recommend sticking to the quantities in the recipe and enjoying the leftovers for lunch the following day as it's so addictive that I'm sure you'll want more! Just be sure to separate the veggies out into two portions so that you can add the dressing freshly to the second portion the next day, to avoid them going soggy. If you're making the two portions together, why not make the dressing in the large bowl first then add the vegetables to save on washing up. Garnish with a sprinkling of fresh coriander (optional) and a wedge of lime to serve.

Three great health benefits: boosts immunity, good source of antioxidants, beneficial for eye health

Serves 2

Ingredients:
1 large carrot, made into flat noodles using a vegetable peeler
1 courgette, spiralised into noodles
1 red pepper, very finely sliced
1/2 small red cabbage, very finely sliced

For the dressing:
3 tbsp smooth peanut butter
3 tbsp water
1 tbsp tamari
1 tbsp maple syrup
1 clove garlic, crushed
1/2 inch piece ginger, grated
Juice of 1/2 lime (use 1 lime if this doesn't yield much juice- taste the sauce to check first!)
Pinch chilli flakes

Method:
1) Place the vegetables into a large mixing or salad bowl. Toss together to combine.
2) Make the dressing by whisking together the peanut butter, water, tamari, maple syrup, garlic, ginger, lime juice and chilli flakes.
3) Immediately before serving, toss the vegetables together with the dressing.

Let me know if you try out this recipe! Tag me on Twitter @HaloEats or Instagram @halo.eats 
Share:

Wednesday 12 September 2018

Courgette and Chive Quiche

courgette and chive quiche

Yes, you read the title of today's recipe correctly! You may be wondering how quiche can be gluten free, dairy free and vegan friendly but I've captured the essence of a classic quiche in this healthy alternative recipe. Many vegan friendly quiches contain tofu to replace the egg but I prefer to avoid tofu- nonetheless, the centre of this is spongy and full of flavour thanks to in-season courgette along with chives. If you're short on time, you can make up to step 4 in advance (i.e. the day before). I really hope you'll give the recipe a try- it's the perfect summer lunch or dinner, served alongside a fresh salad and can be enjoyed hot or cold.

Three great health benefits: good source of Omega 3 fatty acids, promotes healthy skin, anti-inflammatory

Serves 4

Ingredients:
For the base:
1 tbsp chia seeds
1 cup ground almonds
1 cup buckwheat flour
Pinch sea salt

For the centre:
1 tbsp olive oil
1 small onion, finely chopped
1 large courgette, chopped into circles
1 cup chickpea (gram) flour
1/4 cup nutritional yeast
1 tsp ground turmeric
1/2 tsp gluten free baking powder
Sea salt and black pepper
1 cup almond milk (I always use unsweetened)
1/4 cup chives, finely chopped

Method:
1) Start by making a chia "egg" by mixing together the chia seeds with 3 tbsp water. Set aside for 20- 30 minutes, until a gel forms.
2) Preheat the oven to 180 degrees C. Grease a 9 inch tart tin with a little coconut oil.
3) Place the chia egg in a food processor along with the ground almonds, buckwheat flour and salt. Add 1/4 cup water, a little at a time, and continue mixing until the ingredients come together as a "dough".
4) Press the dough in an even layer into the prepared tart tin. Poke holes in the bottom with a fork. Bake for 20 minutes. Remove from the oven and set aside.
5) Heat the olive oil in a large pan over a medium heat. Add the onion and lightly fry to soften. Remove the onion and evenly distribute it over the cooked quiche base.
6) You may need to add a little more olive oil to the pan at this point. Add the courgette and lightly fry to caramelise. Remove from the pan and evenly distribute on top of the onion on the cooked quiche base.
7) Make the quiche centre by stirring together the chickpea flour, nutritional yeast, turmeric, baking powder and plenty of salt & pepper in a mixing bowl. Whisk in the almond milk to form a batter. Finally, whisk in the chives.
8) Pour the herby batter over the onion and courgette in the quiche base. Bake in the preheated oven (180 degrees) for 30 minutes. Allow to rest for 5 minutes before serving.

Let me know if you try out this recipe! Tag me on Twitter @HaloEats or Instagram @halo.eats 
Share:

Monday 10 September 2018

My Favourite Beetroot Juice

my favourite beetroot juice

As the name of this recipe suggests, this is my favourite beetroot juice and the one that's my "go-to" more than any other. I love the flavour combination of earthy beetroot, sweet carrot and apple and spicy ginger & of course, the gorgeous pink colour imparts instant happiness too! This juice is packed full of goodness and it's the first thing I reach for when I'm feeling a little under the weather for whatever reason so I thought it'd be a useful recipe to share to coincide with the inevitable return-to-school bugs!

Three great health benefits: boosts immunity, supports the body's detoxification process, promotes healthy skin

Serves 1
Enjoy immediately

Ingredients:
2 beetroot
3 carrots
1 apple
1 inch piece ginger

Method:
1) Starting with the ginger, feed the ingredients through a juicer one at a time. Pour into a serving glass and enjoy immediately.

Let me know if you try out this recipe! Tag me on Twitter @HaloEats or Instagram @halo.eats 

Share:

Friday 7 September 2018

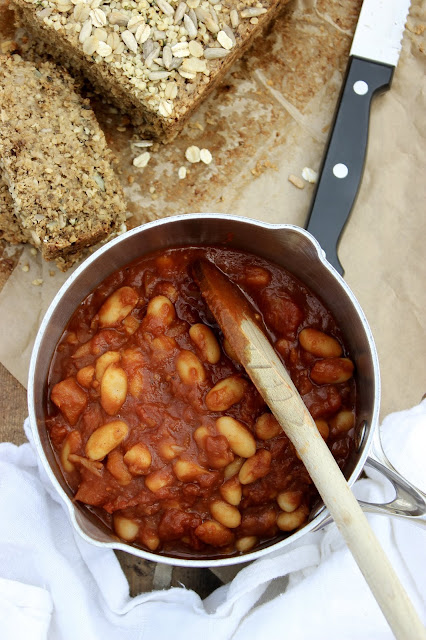
Baked Beans

Baked Beans

I recently realised that most of the breakfast recipes here on Halo Eats are for sweet options, which doesn't necessarily reflect my reality. Well, not at weekends anyway. Sure, during the week, I'll invariably blitz up a smoothie for an on-the-go breakfast and it's no secret that I'm a big fan of a warming bowl of porridge in the colder months. That said, I also love savoury breakfasts and particularly enjoy them at weekends, when I have a little more time. This may be something as simple as the Instagram famous, avo on toast (one of my favourites), or something a little more substantial.

Beans on toast used to be one of my favourite foods (and does anyone remember those baked bean pizzas?! I adored them as a teenager!) and is arguably one of the ultimate comfort foods thanks to its nostalgic associations. These days, I tend to avoid processed tinned baked beans, which since changing my eating habits I now find taste too sweet in any case. With that in mind, it seemed logical to create my own version of baked beans, which I love to incorporate into a weekend breakfast or brunch. These are rich, tomatoey, smokey and slightly sweet. It may take a little bit more effort than reheating the contents of a can but trust me, it's so worth it.

Three great health benefits: boosts immunity, good source of fibre, good source of antioxidants


Serves 2

Ingredients:
1 tsp olive oil
1 small onion, minced in a food processor or very finely chopped
1 clove garlic, crushed
1 x 400g can cannellini beans, drained
1 tsp sweet smoked paprika
1 tbsp tomato puree
1 x 400g can chopped tomatoes
2- 3 tsp (to taste) blackstrap molasses
Sea salt and black pepper

Method:
1) Warm the oil in a saucepan over a medium low heat on the hob. Add the onion and lightly fry for a few minutes before adding the garlic. Lightly fry for a further 1-2 minutes.
2) Add the beans, followed by the paprika and tomato puree. Stir to combine.
3) Stir in the tinned tomatoes and molasses. Season with salt & pepper. Simmer for approximately 15 minutes, until the liquid has reduced and the sauce has thickened.

Let me know if you try out this recipe! Tag me on Twitter @HaloEats or Instagram @halo.eats
Share:

Wednesday 5 September 2018

Jackfruit Lettuce Wraps with Plum Sauce

jackfruit lettuce wraps with plum sauce

Whenever I used to have a Chinese takeaway, one of my favourite dishes was pancakes with plum sauce and as I don't think that I'm alone in that, I wanted to create a healthy & vegan friendly version. I'm so excited to share this recipe with you, with a plum sauce which perfectly captures the classic oriental flavour along with jackfruit for that "pulled meaty" texture and fresh lettuce wraps. It's difficult to get across just how good this is so I really hope that you'll try it for yourself!

Three great health benefits: boosts immunity, promotes healthy skin, beneficial for eye health

Makes 8 wraps
Enjoy immediately

Ingredients:
6 plums, de-stoned and roughly chopped (280g)
1 clove garlic, crushed
1 inch piece fresh ginger, grated
1 (small) red chilli, de-seeded and finely chopped
1 cinnamon stick (2 inches)
2 tbsp maple syrup
2 tbsp tamari soy sauce
2 tbsp water
Freshly ground black pepper (few twists)
1 gem lettuce, washed and outer leaves removed.
1 tbsp coconut oil
1 x 400g can young jackfruit pieces, drained and rinsed

Method:
1) In a small saucepan over a medium heat, place the plums, garlic, ginger, chilli, cinnamon, maple syrup, tamari, water and pepper. Stir and bring to the boil. Allow to bubble for a few minutes before reducing the heat to low and simmering for approximately 10 minutes, until the liquid has reduced (stirring regularly). Remove the cinnamon stick.
2) Meanwhile, remove 8 of the lettuce leaves (keeping them intact so that they will act as "wraps" and place onto a serving plate ready to fill.
3) Warm the coconut oil in a medium frying pan on the hob over a medium temperature. Add the jackfruit pieces and fry for 5-6 minutes, stirring regularly.
4) Break the jackfruit pieces up using a fork so that they resemble "pulled pork". Add the plum sauce and cook for a further 1-2 minutes, stirring regularly.
5) To serve, divide the jackfruit mixture evenly between the lettuce "wraps" and enjoy immediately.

Let me know if you try out this recipe! Tag me on Twitter @HaloEats or Instagram @halo.eats 
Share:

Monday 3 September 2018

Porridge Bread

porridge bread

I know that some coeliacs can't tolerate oats so I'm so pleased that I can as they feature heavily in my diet. Oats themselves are gluten free- although the protein in them (avenin) is similar to gluten- but the production methods mean that there is a high risk of cross contamination hence me buying specially produced (& annoyingly, far more expensive!) gluten free oats. Oats are packed with health benefits including promoting healthy skin thanks to the B vitamin, Biotin and are a good source of soluble fibre, making them beneficial to digestive health- to name just a couple of their positive properties! I wanted to share this oat based Porridge Bread recipe with you today as it's a healthy alternative to the shop bought processed gluten free breads available. This is such a simple bread recipe but makes a loaf which is packed full of goodness. The sprinkle toppings are merely a suggestion- feel free to switch these up for your favourite chopped nuts and seeds. There's something a little bit addictive about this bread and it works well with sweet and savoury toppings alike- don't just take my word for it.. try it with healthy baked beans, smashed avo, chia jam or nut butter and enjoy!

Three great health benefits: boosts immunity, good source of fibre, promotes healthy skin

Makes 1 loaf

Ingredients: 
1 tbsp chia seeds
300g gluten free oats
60g seeds (I used a mix of hemp seeds, sunflower seeds and pumpkin seeds)
1/2 tsp bicarbonate of soda
Generous pinch sea salt
400g coconut yoghurt
1 tbsp blackstrap molasses
1 tbsp almond milk (I always use unsweetened)

For the topping: 
2 tsp hemp seeds
1 tbsp sunflower seeds
1 tbsp gluten free jumbo oats

Method: 
1) Start by making a "chia egg". Combine the chia seeds with 3 tbsp water and set aside for approximately half an hour, until a gel forms. 
2) Preheat the oven to 180 degrees C. Line a loaf tin with baking paper. 
3) In a mixing bowl, combine the oats, 60g seeds, bicarbonate of soda and salt. 
4) Stir in the chia egg, coconut yoghurt, blackstrap molasses and almond milk until thoroughly combined. 
5) Place the mixture in the prepared loaf tin, using a spatula to smooth the top. Sprinkle the top with the hemp seeds, sunflower seeds and jumbo oats. 
6) Bake for 50 minutes. Cool completely in the tin before slicing.

Let me know if you try out this recipe! Tag me on Twitter @HaloEats or Instagram @halo.eats
Share:
© halo eats | All rights reserved.
Blog Layout Created by pipdig