Monday 25 February 2019

Chocolate Covered Stuffed Dates

chocolate covered stuffed dates

These Chocolate Covered Stuffed Dates are perfect for satisfying sweet cravings and what's more, just two dates count as one of your 5 a day. I like to make these at the weekend- they're so simple to make- so that they're on hand throughout the week whenever a sweet craving strikes. Play around with different nut butters and toppings to create your own favourite flavour combinations. I like the combination of almond butter with goji berries, hazelnut butter with chopped nuts, cashew butter with cacao nibs and peanut butter with rock salt but the reality is that the possibilities are practically endless!

Three great health benefits: beneficial for bone health, good source of fibre, energy boosting

Makes 12
Keep refrigerated

Ingredients:
1/4 cup cacao powder
1/4 cup maple syrup
1/4 cup coconut oil
12 medjool dates, pitted (by slicing through the centre lengthways)
6 tsp nut butter (1/2 tsp for each date)
Toppings, as desired: e.g. goji berries, finely chopped nuts, cacao nibs, rock salt

Method:
1) Place the cacao powder, maple syrup and coconut oil in a small saucepan and melt together over a medium heat on the hob, stirring to combine. Remove from the heat and set aside to thicken slightly, until it resembles melted chocolate (the mixture shouldn't set).
2) Line a plate or baking tray with greaseproof paper or a silicone mat. Take each date individually and fill the centre with 1/2 tsp of your desired nut butter. Dip into the chocolate mixture to cover completely then place on the prepared plate or tray. Repeat with each of the dates. After a couple of minutes, sprinkle with your desired topping. Refrigerate for at least an hour to set.

Let me know if you try out this recipe! Tag me on Twitter @HaloEats or Instagram @halo.eats
Share:

Friday 22 February 2019

The "More Than Celery Juice" Smoothie

the more than celery juice smoothie

Celery juice has been having something of a "moment" in the wellbeing spotlight recently, with celebrities including Gwyneth Paltrow and Kim Kardashian extolling its benefits. It's a surprising trend which arguably, no-one could have seen coming but when looking into its origins, most sources tend to point towards Anthony William who promotes the idea of drinking 470ml celery juice on an empty stomach in the morning, claiming that the antioxidants in the juice may help with IBS, diabetes, mental health, skin concerns and inflammation, to name a few.
I must confess that I've been somewhat dubious and suspect that the fact that most of us are in a chronic state of dehydration, coupled with celery's high water content answers why so many feel better after drinking the "elixir". That said, I do believe that starting the day off on a healthy note sets us up for the day ahead- if you've set out with good intentions, you're more likely to continue them throughout the day.
Personally, I need something more substantial in the morning than a glass of juice (admittedly, some do follow their celery juice with breakfast) so I created this green smoothie which is based on the juice but which also incorporates ingredients to promote satiety. It gets you well on your way to 5 a day and is ideal for on-the-go. 

Three great health benefits: boosts immunity, promotes healthy skin, anti-inflammatory 

Serves 1
Enjoy immediately

Ingredients: 
2 stalks celery
1/2 cucumber
1 frozen banana
1 handful spinach
1 tbsp almond butter
1 tbsp maple syrup 
1 tsp chia seeds
Almond milk (optional)

Method: 
1) Feed the celery and cucumber through a juicer. This should yield around 250ml (1 cup) juice but if it's less, top up with almond milk. 
2) Place the juice in a blender along with all of the other ingredients. Blend until smooth. Enjoy immediately.

Let me know if you try out this recipe! Tag me on Twitter @HaloEats or Instagram @halo.eats


Share:

Wednesday 20 February 2019

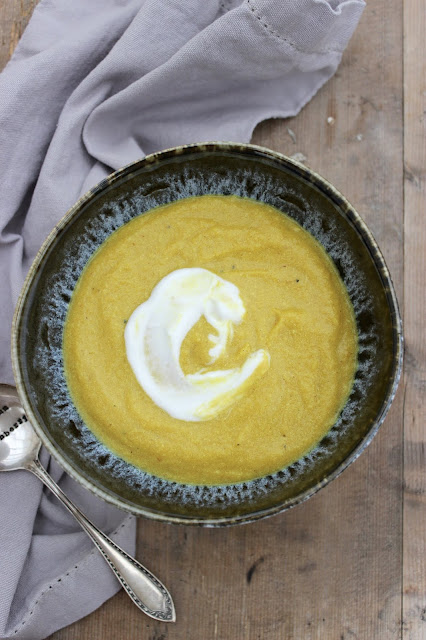
Spice Roasted Cauliflower Soup

spice roasted cauliflower soup

Lots of you seem to really like my soup recipes and I think that this one will prove as popular as ever. Cauliflower provides an indulgent creaminess and this, together with the warming spices, makes for the most comforting bowl of soup. Don't be put off the name of this soup if you're not a fan of hot spicy food.. the emphasis here is very much on flavour rather than heat. As tends to be the case with soup, this freezes well so I often double the recipe and make a big batch to freeze in handy individual portions.

Three great health benefits: boosts immunity, good source of fibre, anti-inflammatory

Serves 4

Ingredients:
1 cauliflower, chopped into florets (mine weighed 700g)
2 tbsp coconut oil (liquid)
1 & 1/2 tsp ground turmeric
1 tsp cumin
1 tsp chilli flakes
1 onion, finely chopped
2 cloves garlic, crushed
1 x 400g coconut milk
500ml vegetable stock
Sea salt and black pepper

Method: 
1) Preheat oven to 180 degrees C. 
2) Place the cauliflower in a roasting tin & toss together with 1 tbsp of the coconut oil and spices (turmeric, cumin and chilli flakes) so that the florets are evenly coated. Roast for 30 minutes. 
3) In a large saucepan, warm the remaining 1 tbsp coconut oil over a medium heat on the hob. Add the onion and lightly fry for a few minutes until softened. 
4) Add the garlic and lightly fry for a further minute before adding the spice roasted cauliflower.
5) Stir in the coconut milk, vegetable stock and salt & pepper. Bring to the boil then reduce the heat and simmer for 10 minutes.
6) Place the soup in a blender and blend until smooth, adding a little water if desired to reach your desired texture (I added 200ml). 

Let me know if you try out this recipe! Tag me on Twitter @HaloEats or Instagram @halo.eats
Share:

Monday 18 February 2019

Cauliflower and Turmeric Falafel

cauliflower and turmeric falafel

You may not be surprised to see another falafel recipe from me- I really enjoy them as a high protein meal and like to switch up the flavours to keep things interesting. This is the one I've been gravitating towards recently, incorporating in-season cauliflower which is cheap, readily available and boasts health benefits including being a good source of fibre and anti-inflammatory.
I tend to enjoy these as part of a salad box for lunch, with a dollop of hummus, and whilst they can be enjoyed hot or cold, I do appreciate that they are so easy to prepare in advance. What's more, step one can be done beforehand, if desired.
Top tip: wear gloves when rolling the balls into shape to avoid staining your hands with the turmeric!

Three great health benefits: good source of fibre, helps support the body's detoxification process, anti-inflammatory 

Makes 8

Ingredients:
1 small cauliflower, roughly chopped into florets (425g)
1 tbsp olive oil
1 tsp turmeric
1 x 400g can chickpeas, drained and rinsed
1 clove garlic, peeled
2 tbsp chickpea flour (also called gram flour)
1 handful fresh coriander

Method:
1) Preheat oven to 200 degrees C. Place the cauliflower in a roasting tin, drizzle with 1tbsp of the olive oil and sprinkle with the turmeric, ensuring all pieces are evenly coated. Roast for 20 minutes, turning halfway through the cooking time. Remove from the oven and set aside to cool.
2) Next, place the spiced cauliflower in a food processor along with the chickpeas, garlic, chickpea flour and salt & pepper. Whizz to thoroughly combine then add the coriander and whizz again.
3) Form into balls, approximately the size of a golf ball and place on a baking tray, greased with a little olive oil.
4) Bake in the preheated oven (at 200 degrees C) for 30 minutes.

Let me know if you try out this recipe! Tag me on Twitter @HaloEats or Instagram @halo.eats
Share:

Friday 8 February 2019

Butternut Squash and Harissa Soup

butternut squash and harissa soup

This soup is so simple but packs a flavour punch, along with providing a hit of beta carotene which is beneficial for skin, immunity and eye health. It's warming and satisfying and what's more, freezes well. I like to make a big batch (doubling the recipe) and freeze it in individual portions, so that I have it to hand for a quick yet nourishing lunch or light dinner when required.

Three great health benefits: boosts immunity, beneficial for digestive health, promotes healthy skin

Serves 2

Ingredients:
1 butternut squash, peeled and chopped into bitesized pieces (mine weighed 500g)
4 carrots, chopped into "coins" (mine weighed 380g)
1 tbsp olive oil, plus extra for roasting
1 red onion, roughly chopped
500ml vegetable stock
2 tbsp rose harissa paste
200ml water
Sea salt and black pepper


Method:
1) Preheat oven to 190 degrees C.
2) Place the butternut squash and carrot into a roasting tin, season with salt & pepper and drizzle with olive oil, ensuring that all of the pieces are evenly coated. Roast for 35-40 minutes.
3) Warm 1 tbsp of the olive oil in a large saucepan over a medium heat on the hob. Lightly fry the red onion for a few minutes, until softened.
4) Add the roasted vegetables along with any remaining oil from the roasting tin, as well as the vegetable stock, harissa and water. Stir together and simmer for 15 minutes.
5) Place in a blender and blend until smooth, adding more water if required so that the soup is of your desired consistency. Reheat to serve.

Let me know if you try out this recipe! Tag me on Twitter @HaloEats or Instagram @halo.eats
Share:

Friday 1 February 2019

Apple and Blackberry Crumble Smoothie (Nut Free)

apple and blackberry crumble smoothie

So many of my smoothies contain nuts, whether that be in the form of nut butter for added protein or a nut milk base, because this reflects my reality & how I tend to enjoy smoothies. Whilst these ingredients can be swapped for nut-free alternatives such as seed butters or alternative "milks", I thought it was about time that I shared another smoothie option which is specifically nut free. This Apple and Blackberry Crumble Smoothie is flavourful, sweet and indulgent and I hope you'll enjoy it whether or not you avoid nuts. 


Three great health benefits: boosts immunity, good source of fibre, promotes healthy skin

Serves 1
Enjoy immediately

Ingredients:
4 small apples
1 small frozen banana
1/2 cup frozen blackberries
1 tbsp gluten free oats
1/2 tsp ground cinnamon

Method:
1) Pass the apples through a juicer and collect the juice (should yield approximately 1 cup, or 250ml).
2) Place all of the ingredients in a blender and blend until smooth. Enjoy immediately.

Let me know if you try out this recipe! Tag me on Twitter @HaloEats or Instagram @halo.eats
Share:
© halo eats | All rights reserved.
Blog Layout Created by pipdig